Vectorizing an image is the process of converting a raster image, composed of pixels, into a scalable vector format using Adobe Illustrator. Vector graphics are resolution-independent, meaning you can resize the object without losing its quality.
My name is Kerry, I love using Adobe Illustrator to make vector graphics because it allows me to edit the vector and scale it for different purposes. Plus, it’s super easy to convert an image into a vector using the Image Trace tool.
In this tutorial, I will guide you through the steps to vectorize an image in Adobe Illustrator, allowing you to create crisp and editable artwork.
Are you ready to learn more about this topic? Let’s go!
Contents
How to Vectorize an Image in Adobe Illustrator
Here are the detailed steps to vectorize an image in Adobe Illustrator:
Step 1: Add the image you want to vectorize to Adobe Illustrator by clicking on File from the overhead menu and choosing Place.
Browse for the image file on your computer and click Place to import it onto the Artboard.


Step 2: Select your image, and you’ll see the Image Trace option under the Properties > Quick Actions panel. The Image Trace feature allows you to convert an image into a tracing object.

If you want to see the full options and settings, you can also open the Image Trace panel from the overhead menu Window > Image Trace.

In the Image Trace panel, you will find various preset options to choose from.
Step 3: Select a preset that you want.
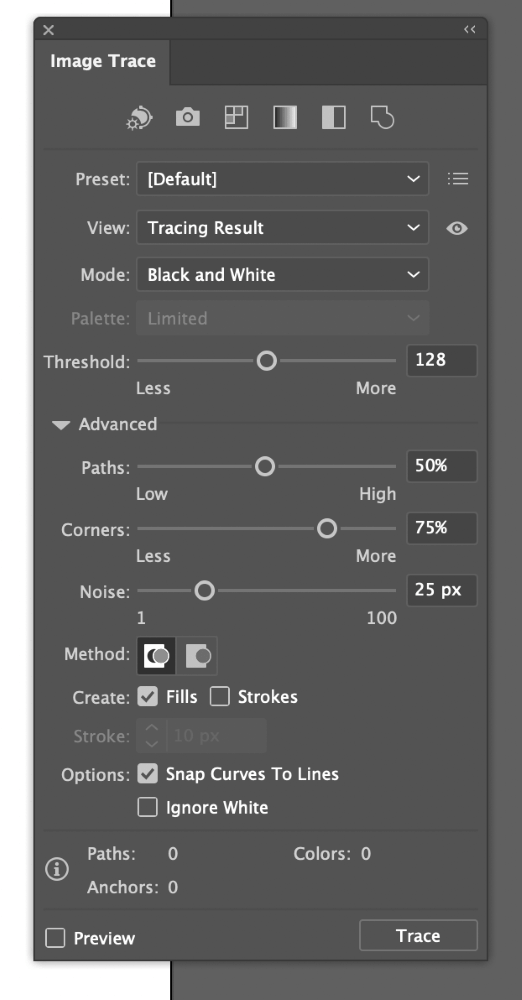
For example, if you have a black and white line drawing, choose the “Black and White Logo” preset. You can also experiment with different presets to achieve the desired effect.

After selecting a preset, click Trace to apply the image trace and convert the raster image into editable vector paths.
Once the image is vectorized, you can refine the paths and optimize the artwork further. If you want to edit the vector paths, select the image and click Expand on the Properties or Control panel.

Then you can feel free to change the vector color or edit the shape. Make sure to ungroup the selected image first.

How to Edit a Vector in Illustrator
The first thing you can do is to remove the unwanted area.

Then you can use different vector editing tools to manipulate the vector. For example, you can use the Direct Selection Tool to select individual anchor points and manipulate them as needed. You can add, delete, or move anchor points to achieve the desired shape and precision.
You can also use the Pen Tool to make additional adjustments to the paths. This tool allows you to create and edit anchor points, curves, and straight lines, giving you full control over the vectorized image.
If your vectorized image contains multiple colors, you can use the Paint Bucket Tool to assign different colors to individual areas. Click on the desired color swatch and then click on the specific area of the image to fill it with color.

How to Save a Vector in Adobe Illustrator
Once you are satisfied with the vectorized image, it’s time to save and export your artwork. To save the file in Adobe Illustrator format, go to File > Save or use the shortcut (Ctrl/Command + S). This will preserve the vector data for future editing.
Select the desired file format, such as SVG (Scalable Vector Graphics) or EPS (Encapsulated PostScript), and adjust the settings accordingly. Choose a suitable location to save the exported file and click Save.
If you want to export the vectorized image for web or other purposes, for example, saving it with a transparent background choose File > Export > Export As and choose the PNG format.
Final Thoughts
Vectorizing an image in Adobe Illustrator allows you to create versatile and scalable artwork. The easiest way to vectorize an image is using the Image Trace Tool. Once the image is vectorized, you can use vector editing tools like Pen tool and Direct Selection tool to edit the paths.
Do you have experience vectorizing an image within Adobe Illustrator? We would love to hear from you! Please share them below.