There are a few ways to add a border on Canva. The easiest one is using a pre-saved border design in Canva. Click on the “Elements” button located in the menu on the left side of the screen. Type “border” in the search field and hit “Enter” to see all the border styles available.
My name is Yana and I’ve spent the last six years working with Canva. Using both the Free and Pro versions of Canva, I have made graphic designs for social media platforms and blogs. I’ve created designs with borders multiple times and therefore I’m proficient in using this feature in Canva.
In this article, I will cover a few different ways how you can add a border on Canva. All of them are easy to complete, and you can decide which method to choose depending on the results you want to achieve.
Contents
Key Takeaways
- By adding a border to your design, you can provide a visual separation between elements, highlight specific content, or define the edge of the design.
- There are a few ways of adding borders on Canva: by selecting a pre-saved border, creating a custom border, adding a shape, or choosing one of the templates available.
- When using the template method, make sure you are adding a template to a new design frame. Otherwise, the template will replace your design and all the progress will be lost.
How to Add a Border on Canva Web
There are four different ways to add a border on Canva. Once you figure out how to do it, you can start using this feature regularly in your projects. All of them are easy and can be done in a few simple steps.
1. Add a Border Using Canva Elements
From my point of view, this is the easiest way you can add borders on Canva. This way gives you access to dozens of border options.

Select the Elements icon from the menu on the left side of the screen by clicking on it. Then check all of the borders available, type “border” into the search field and press Enter.

You will see all the graphic elements that can be used as a border. Find the border you would like to place and click on it, to add it to your design. Now you can resize, change the color palette, or add some transparency to your border element.
2. Add a Border Using Shapes

This method will work if you want to add a simple square border with sharp or rounded corners.
To find the square border, select the Elements button from the side toolbar, and this time type “square” or “rectangle” into the search input.

You will see the graphics that can be used in your design. Click on the square to add it to the design frame. You will be able to edit a border right after adding it to your design file.
3. Create a Border Manually
If you need some elegant border or simply didn’t find the one you would like to use, you can create a border by yourself.

First, open the Elements tab from the side menu bar and find the Lines & Shapes tab. Click on it to open a new window with lines that you can use to create your custom border.
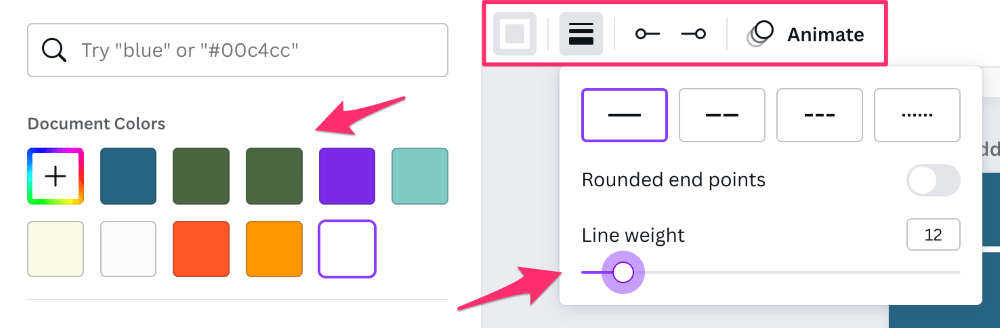
Select the style that will work best for your design project, and click on it. Once you have a line added to your design canvas, select and start dragging one of its corners to change the size.
You can also change the color and the line style, add or remove rounded corners and change the line weight. All these settings you can explore in the menu at the top of your design file.

You will need to have at least three more of the same lines, to create a border. You can duplicate the original one, by clicking on the Duplicate icon when the line is selected. Or use the shortcut Command + D (for Mac) or Ctrl + D keys (for Windows).
When you have all the lines ready, rotate and place them correctly to create a border.
4. Add Border Using Templates
This method, in my opinion, is ideal for getting ideas for using borders in design. The best part is that once you’ve found the perfect one, you can incorporate it into your project.
Just ensure that you add the template to a new design frame and drag and drop a border from a template to your design. This is important because if you click on one of the templates while your working design frame is selected, you will lose all the progress and your design will be replaced by a template.
If this has happened to you, just click on Undo button on top of the screen to return to the previous design version.

So, how to find border templates? Select the Design tab on the left side toolbar and type in the search field “border”. You will see plenty of templates ready to be used. Just check them to have some ideas or add one of the borders to your design.
How to Add a Border on Canva Mobile
You also can evaluate your design by adding a border using your mobile device. While it may be not convenient due to limited size of the screen, it is still can be done in a few different methods.
1. Add a Border Using Canva Pre-Saved Borders

Open a design file on your smartphone or tablet and tap on the purple rounded button in the bottom left corner.
Find and select the Element button at the bottom of the screen. Start typing “border” in the search field at the top of the screen and you will see all the graphics borders ready for your usage.
Choose one to place in your design and start editing. Save and download a design to your device when you are happy with the results.
2. Add a Border Using Shapes

Another method is by adding a simple bordered square to your design.
Select the Elements button from the bottom menu, and this time type “square” into the search field to find a square border. Tap on the one that would work for you.
When you place a border on your design canvas, use handles to make the shape fit perfectly in the area where you want your border to appear.
3. Create a Border Manually

This method will take you the longest time.
First, select the Lines & Shapes tab under the Elements tab in the bottom menu bar. When you click on it, a new window with lines appears and you can select between dashed, dotted, and solid lines.

When you add a line you can customize its color, corners and try various widths. You can always find this setting at the bottom of your screen when the line is selected.
Now tap on the Duplicate icon, to create three more identical lines and place them the way they create a border.
4. Add Border Using Templates

This tool is tricky because it can replace your design fine with a template one.
So just make sure that before placing one of the templates in your design file, you create a new design frame where it will be added.
But if this has happened to you, you always can go back by tapping the Undo icon at the top of the screen.

To find templates, open the Design button in the bottom menu and you will see the Template tab. Type “border” in the search field to see all the templates that include borders.
To transfer a border from the template to your original design, select the border and then tap on the icon with three dots on it. You will see the options at the bottom of the screen. Select Copy.

Then come back to your design, click on the design frame and “More” icon, with three dots on it, to find the Paste action.

Save and download your design to your device by clicking the Share icon at the top of your screen.
Final Thoughts
Whether you are working on a desktop or mobile device, adding a border in Canva is a simple process that can create a significant difference when used correctly. Just choose one of the methods above and follow the steps I provided.
Do you often use borders working on your designs in Canva? Which method do you prefer? Are there any tips you would like to share? Feel free to leave a comment and share your experience.