
Figma is a cloud-based design software that made a big splash a few years ago. Thousands of designers around the world love Figma for its user-friendly, intuitive interface and features that aren’t found in other design software.
But it can still be overwhelming to learn if you are just starting your path in UI/UX design or choosing to switch to Figma from another design software. To ease this process, we have created a comprehensive guide tailored specifically for Figma newcomers.
My name is Yana and I’ve been working with graphic content for several years now. I first heard about Figma a couple of years ago, when I started learning web design as a hobby. Figma is a tool that I’ve used to create pet design projects, and I continuously use it to enhance my skills.
In this tutorial, I’ll be sharing the essential knowledge to kickstart your first design project in Figma. I will also guide you through some unique Figma features that can help you to improve your skills, along with sharing valuable tips and tricks.
Let’s get started!
Contents
Chapter 1: Figma Overview

If you’ve been wondering whether you should start using Figma, I hope this brief overview can help you answer that question.
Figma is an essential design tool for web designers, offering them the ability to create designs and prototypes for websites and mobile applications. It has an intuitive interface and it’s available for free for personal use.
It is a cloud-based software, enabling real-time collaboration among designers within your team so that you can work on projects together.
Furthermore, Figma allows you to share your designs as CSS code or code for Android and iOS applications, making it easy for developers to transform your design into a fully functional product.
However, it’s important to note that Figma might not be the best choice for complex graphic design tasks. While it offers basic functionalities, you might prefer another design software like Adobe Illustrator for more intricate work with illustrations or vector images.
While the multitude of features in Figma might appear overwhelming at first, as you gradually become familiar with the tool, you’ll uncover its simplicity and logical structure.
Chapter 2: How to Create a Figma Account

First things first, let’s start with the sign-up process. Head to Figma’s official website and hit the Get Started button. Create a new account by using your email and a password. Next, open the Figma browser version or install the Figma desktop application.
I prefer to use the Figma app because it operates faster and has fewer bugs. If you prefer to keep everything in one place, you can use the Figma browser option.
Chapter 3: Figma File Structure
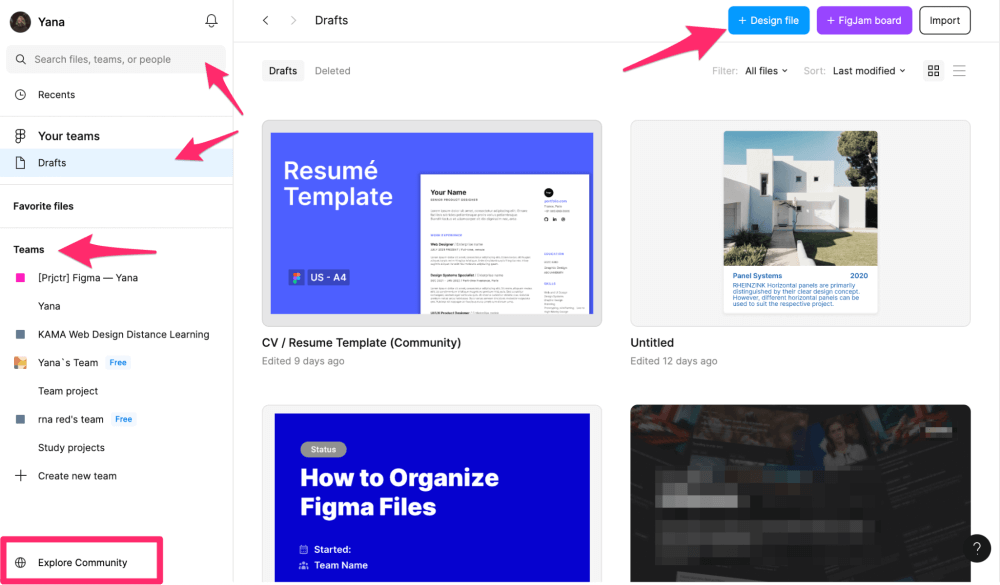
Once you are logged in, you will see the Figma dashboard. If you click on your profile image in the top left corner, you can access your account settings. You can also search for projects easily by using the search bar.
By default, you will see a list of your most recent files on the main dashboard. Press the + Design file button to create your first design project.
Next, in the sidebar menu, you will see the Drafts folder, your favorite projects, and the list of your teams. You can create as many teams as you want, but keep in mind that you only get a limited number of files and projects in the Starter Figma plan. For instance, you can only have one project with up to three Figma designs and create three pages for each design file.
Learn more about the available Figma plans and prices.
In the bottom left corner is the Explore Community button. Clicking on this tab will bring you to the Figma community page. This is a great place to find tons of inspiration, ideas, and useful plugins. The community is constantly growing, so you’ll always have fresh resources to explore and learn from.
Chapter 4: Design Basics
Let’s take a look at the project structure. You will see the top menu, working canvas, the list of layers and assets on the left, and the styling properties on the right. The name and location of the file is in the center of the top menu.

Find the Figma icon in the top left corner and click on it to display the design file settings and available features. I recommend exploring this section to become familiar with the full range of features Figma has to offer. In the following section, I’ll walk you through the most important ones, providing you with an overview of the basics.
Frames

Any design project starts with the canvas. To create your first frame, click on the button with the Frame icon or press the F key. You can click and drag a freely-sized frame or choose from one of the pre-saved options located in the left-side menu.
Once you have added a frame to the working canvas, it will appear on the list of layers on the right side of the screen. Here is where you can find all of the pages on your file and the list of design assets.
Grids

Before we move on to the design elements, it is important to talk about grids. Grids are a great feature that allows you to maintain the structure and layout consistency of your design. You can add it to your frame so it navigates you as you work on the project.
To add a grid, select a frame and find the Layout Grid in the menu on the right side of the screen. Click on it to adjust the grid and add columns and rows to navigate.
For this example, I used 12 columns with a gutter of 20 and set my margin to 40. Make sure that the grid is set to “Stretched” mode, so it automatically adjusts when you resize the frame. You can hide or show the grid by pressing the Shift + G key.
Over time as you use Figma, you can experiment with the grids feature to build more complex layouts. As a beginner, using the 12-column grid is a great place to start.
Design Elements

Once you have a frame to work with, you can add a design element to it. To view all the available shapes, click on the square icon at the top menu to open the drop-down menu.
When working with Figma, one of the easiest ways to significantly speed up the design process is to use keyboard shortcuts. For example, when using shapes, you can hit the O key to add a circle or press the R key to add a rectangle.
To change the shape’s size, select the shape and start dragging one of the corners. To resize the shape while keeping the original ratio, press and hold the Shift key. You can also add an image by using Shift + Command/Ctrl + K or crop it into a circle.
Next in the top menu, you can see the T button, which you can click to add text to your design. You can just hit the T key and start typing your text.
Properties

After adding a design element, you will notice the toolbar on the right side of the screen that includes the different properties. This is where all the magic happens. Let’s take a closer look at each property.
- Alignment and Size. At the top of the menu, you will find the alignment options and location of the element on the X and Y axis. Next, you’ll come across the element’s size, rotation angle, and the option to round the corners.
- Constraints. This is an important feature that when used correctly, helps you build a design for different screens. The layout responds correctly when you change the size of the frame.
Learn more about constraints and how they function in this short Figma video tutorial.
- Layers. The layers property allows you to adjust the layer’s behavior, change the transparency, and hide it or make it visible again.

- Text. When working with text, you will find an additional menu where you can change the font style, size, spacing, alignments, and more. You can also upload a new font to Figma if needed.
- Fill and Stroke. You can choose the color and adjust the transparency of the design element. Within the Fill section, you can further enhance the element by adding a gradient, image, or even a video. Moving on, you can apply the stroke style, customize its size, and modify its placement.
- Effects. This property allows you to add shadow or blur effects. Click on the sun button to adjust the effects.
Styles
Just picture the countless times you’d have to manually add each property when creating a design. That’s why the Figma team introduced the “Styles” feature. You can save any property, such as the text font, color, and effects as a style and reuse it whenever you need.

To save the text properties as a style, select the text box and find the Text section in the right-side menu toolbar.
Click on the Style button with the four dots, and press the + icon to create a style. Give the style a proper name, such as H2, H3, or body text. This way it will be easier to navigate through your design and locate the styles as you work on your project.
To save properties, such as colors, strokes, or effects, click on the Style button with four dots. Then press the + icon to create and name a new style.

After that, you will see the list of all the styles in the design project in the properties menu.

To apply a saved style to an element, first, select the desired element on the canvas. Then, navigate to the property section where you wish to update the style and click on the “Style” button. A list of all available styles will be displayed, allowing you to effortlessly choose the appropriate one to apply to the selected element.
Pro Tip: If you want to reuse the same properties without creating a style, you can copy them by pressing Shift + Command/Ctrl + C, and then paste them by pressing Shift + Command/Ctrl + V key combination.
File Organization
Here are some tips to organize your files and elements in Figma. When you begin working in Figma, make it a habit to name each element, page, and frame so that they can be easily located.
This becomes really useful when you want to share your files with someone. Find out more about file organization in Figma here.
File Export

Below the properties menu, you will see the Export button. Click on it to choose the element or frame you want to download. Select the desired file format and hit the Export button to save it to your computer.
You can also preview the design before downloading it or save the element on a transparent background by selecting the PNG file format.
Chapter 5: Auto Layout

Auto Layout is one of the unique features that sets Figma apart from other design software.
With Auto Layout, you can arrange elements in a design that adjusts automatically as you change the frame’s size. You can quickly and easily create responsive designs for various screens with the help of Auto Layout.
Mastering this feature may require some time for experimentation and learning from mistakes to understand how it works. If you feel that this is something you are ready to learn, check out our in-depth article about Figma auto layout.
Chapter 6: Components

Another unique Figma feature is components. Components are reusable elements that can be used across your design file multiple times. By creating master components and duplicating them, you can generate instances with the same properties.
The best part is that when you make changes to the master component, they are displayed automatically on all of the component instances. This helps to speed up the design process significantly!
To create a component, press Option+Command+K keyboard shortcut for Mac and Alt + Ctrl + K for Windows. After that, you can always find them in the Assets tab in Figma or you can create a separate page to keep all the components in one place.
Check out this great Figma video tutorial about components:
You can also create variants of the main component. For example, let’s say you need buttons in different states: default, pressed, and hovered. You can create variants for each state with different properties, but all of them will be under the same master component.

Sounds cool, right? Check out this Figma article on how to create variants.
Chapter 7: Figma Community

Figma goes beyond providing a seamless designer experience; it also fosters a thriving community. The Figma community is a place where designers and developers all over the world can create some great projects to use and share with others.
The Figma community includes design systems, UI kits, assets, and other ready-to-use resources that save you time and effort in the design process.
I can’t imagine using Figma without plugins. From discovering free icons to organizing styles on a separate page for seamless management, there’s a plugin available for every designer’s need.
You can discover plugins in the Figma community or search for them from the Resources tab. Find out more about using Figma plugins in this post.
Chapter 8: Prototypes

The prototype feature is not for beginners, but this Figma tutorial would not be complete without mentioning it. You can create high-fidelity designs and interactive prototypes, which you can share with others to collect valuable feedback.
Once you have a design project with multiple screens, you can select one of the elements you want to make interactive. Next, click the Prototype button at the top of the right sidebar menu.
Then add the interaction by moving the blue arrow from one element to another. You can also adjust the settings and how the prototype responds. To preview the prototype, click on the Play button in the top right corner.
If you want to learn more, check out this Figma video tutorial on prototypes.
Chapter 9: Collaborate in Figma
Since Figma is a cloud-based application, collaborating on it is super easy. You can share a link to your design file or invite a person through their email address. Just hit the Share button to do this.
People invited to view your file like your team members can leave comments on your designs and you can communicate and share ideas directly in the project. For users with more advanced Figma plans, like Professional and Corporate, they can even create team libraries to share design assets among all team members.
If you have questions or want to learn more about working with Figma, make sure to check out our other articles on Figma and subscribe to Figma’s official YouTube channel. They’ve got plenty of tutorials with the best practices that will ensure your design process is smooth.
Final Thoughts
Congratulations on finishing this Figma beginner’s tutorial! I hope you now have a solid understanding of how Figma works and are ready to dive in on creating your first design project.
Since Figma is constantly being updated and has almost countless capabilities, there is always room for improvement and learning new techniques. Remember to explore the free online resources to expand your knowledge and connect with other designers for insights.
Additionally, I suggest keeping an eye on the Figma community page for fresh ideas and staying updated on the latest Figma news by following their official YouTube channel.
Do you have other tips or tricks that helped you start using Figma? Share your thoughts in the comments section below.